[2016/12/19追記]「「MBAでスクリプトを書き、リモートサーバ上で実行する」をGitで実現する - Qiita」を公開しました。ここと同じ仕組みでWordpressでなくRubyスクリプトを管理する方法です。
「ベアリポジトリとノンベアリポジトリ:理論編〜GitでWordpressのテーマを管理」の続き、実践編です。
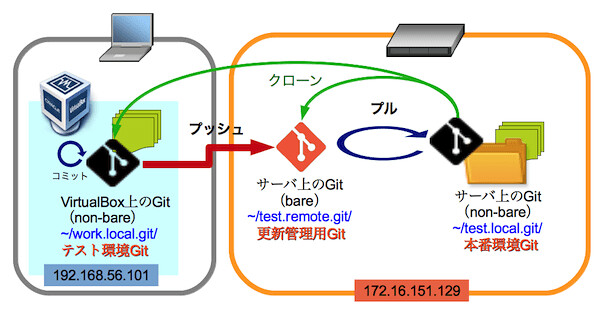
本番環境にいきなりやるのは怖すぎるので、以下の様な環境を作ってやってみます。
| リモートサーバ上のGit(bare)「更新管理用Git」 | 172.16.151.129:~/test.remote.git/ |
| リモートサーバ上のGit(non-bare)「本番環境Git」 | 172.16.151.129:~/test.local.git/ |
| ローカルマシンのVirtualBox上のGit(non-bare)「テスト環境Git」 | 192.168.56.101:~/work.local.git/ |
オリジナルのファイルは本番環境Git(172.16.151.129:~/test.local.git/)にあるものとし、更新管理用Gitの172.16.151.129:~/test.remote.git/とテスト環境Gitの192.168.56.101:~/work.local.git/には、オリジナルファイルをクローンする、という設定です。
まずはリモートサーバの設定から。
1.リモートサーバ上で本番環境Git(ノンベアリポジトリ)を作る
Gitインストール
これはもう簡単にapt-getで。
$ sudo apt-get install git
Git設定
これも簡単。
$ cd ~/test.local.git/
$ git init
こんだけです。
コミットしてみる
ファイルを作成して、コミットしてみます。
$ touch test.txt
$ git add test.txt
$ git commit -m 'first commit'
[master (root-commit) f58010d] first commit
0 files changed
create mode 100644 test.txt
$
できたっぽい。いちいちgit addするのが面倒なので、次回からgit commit -a(変更したファイルを全部コミット)にします。
2.リモートサーバ上に、1.で作ったリポジトリのクローンを更新管理用Git(ベアリポジトリ)として作る
クローンていうからには実際のファイルもコピーされるんじゃないの?と思いますが、--bareオプションでよきに計らってくれるようです。
更新管理用Git作成
簡単です。
$ cd ~/test.remote.git/
$ git clone --bare ~/test.local.git/ .
Cloning into bare repository '.'...
done.
-
- bareでベアリポジトリであることを宣言。
本番環境Gitに更新管理用Gitを追加
本番環境Gitでの設定です。
$ cd ~/test.local.git/
$ git remote add origin ~/test.remote.git/
本番環境Gitにファイルを追加してコミットし、更新管理用Gitにプッシュする
動作確認。まずはファイルの追加。
$ cd ~/test.local.git/
$ touch test2.txt
$ git commit -a -m 'second commit'
[master ab7e601] second commit
0 files changed
create mode 100644 test2.txt
ついでにtest2.txtの内容を変えてコミットしてみた。
$ echo "aaa" > test2.txt
$ git commit -a -m 'third commit'
[master bd33257] third commit'
1 file changed, 1 insertion(+)
$
そしてプッシュ。
$ git push origin master
Counting objects: 17, done.
Compressing objects: 100% (12/12), done.
Writing objects: 100% (16/16), 1.25 KiB, done.
Total 16 (delta 5), reused 0 (delta 0)
Unpacking objects: 100% (16/16), done.
To /home/nekotricolor/test.remote.git/
862bd0f..7b8f4d9 master -> master
できてますね。嬉しい。
3.ローカルマシンのVirtualBox上のUbuntuにテスト環境Git(ノンベアリポジトリ)を作る
次はVirtualBox上での設定です。
Gitインストール
これもapt-getで。
$ sudo apt-get install git
Git設定
更新管理用GitのクローンをVitrualBox上のテスト環境Gitのディレクトリに展開。こちらはノンベア。ベアリポジトリからノンベアリポジトリにクローンとかどうなの?と思いましたが。
$ cd ~/work.local.git/
$ git clone ssh://nekotricolor@172.16.151.129/~/test.remote.git/ .
Cloning into '.'...
lsしてみる。
$ ls -a
. .. .git test.txt test2.txt
できてますね。すげー。
クローンにしたせいか、すでにoriginの設定もされていました。
$ git remote -v
origin ssh://nekotricolor@172.16.151.129/~/test.remote.git/ (fetch)
origin ssh://nekotricolor@172.16.151.129/~/test.remote.git/ (push)
テスト環境Gitディレクトリでファイルを編集してコミット、更新管理用Gitにプッシュしてみる
動作確認。test.txtに「aaa」という文字列を入れてみます。
$ cd ~/work.local.git/
$ echo 'aaa' > test.txt
$ git commit -a -m 'insert aaa into test.txt'
[master 4bb383f] insert aaa into test.txt
1 file changed, 1 insertion(+)
$ git push origin master
nekotricolor@172.16.151.129's password:
Counting objects: 3, done.
Compressing objects: 100% (2/2), done.
Writing objects: 100% (2/2), 236 bytes, done.
Total 2 (delta 1), reused 0 (delta 0)
To ssh://nekotricolor@172.16.151.129/~/test.remote.git/
7b8f4d9..4bb383f master -> master
リモートサーバ上の本番環境Gitから、更新管理用Gitの更新ファイルをプルしてみる
後でフックを使って自動化するところです。
$ cd ~/test.local.git/
$ git pull origin master
remote: Counting objects: 3, done.
remote: Compressing objects: 100% (2/2), done.
remote: Total 2 (delta 1), reused 0 (delta 0)
Unpacking objects: 100% (2/2), done.
From /home/nekotricolor/test.remote
* branch master -> FETCH_HEAD
Updating 7b8f4d9..4bb383f
Fast-forward
test.txt | 1 +
1 file changed, 1 insertion(+)
$ cat test.txt
aaa
ぬおーできてる!
4.更新管理用Gitのフックを使って、プルを自動化する
フックのスクリプトは.git/hooksに入っています。
フックは様々なタイミングで使えるそうですが、今回は「自分にプッシュされた時」なのでpost-receiveというのを使います。
post-receive作成
ということで、更新管理用Gitの.git/hooks/post-receiveというファイルに(ないので作りましょう)、以下のコマンドを書きます。
#!/bin/sh
cd ~/test.local.git/ || exit
unset GIT_DIR
git pull origin master
これはここのパクリです。どうやらunset GIT_DIRしないと、カレントディレクトリでgit pull出来ないらしい。
# unsetしないと、「remote: fatal: Not a git repository: '.'」というエラーが出る
で、実行権限を付けるのを忘れずに。
$ chmod 755 post-receive
動作確認
これで、テスト環境Gitディレクトリでファイルを編集して、コミット・プッシュしてみます。
$ cd ~/work.local.git/
$ echo 'ooo' >test.txt
$ git commit -a -m 'changed test.txt to ooo'
[master 35564b4] changed test.txt to ooo
1 file changed, 1 insertion(+), 1 deletion(-)
$ git push origin master
nekotricolor@172.16.151.129's password:
Counting objects: 5, done.
Compressing objects: 100% (2/2), done.
Writing objects: 100% (3/3), 333 bytes, done.
Total 3 (delta 0), reused 0 (delta 0)
remote: From /home/nekotricolor/test.remote
remote: * branch master -> FETCH_HEAD
remote: Updating 1977305..35564b4
remote: Fast-forward
remote: test.txt | 2 +-
remote: 1 file changed, 1 insertion(+), 1 deletion(-)
To ssh://nekotricolor@172.16.151.129/~/test.remote.git/
1977305..35564b4 master -> master
できました!これで、本番環境Gitディレクトリのtest.txtの内容が「ooo」に変わっています。
権限の問題
これ、リモートサーバ上でいじっているディレクトリは全部(rootでなく)自分のアカウントの権限で書き換え可能だからいいんですけど、例えば/var/www以下にノンベアリポジトリがある場合(が自然かと思いますが)、上記のスクリプトを単純に実行してもPermission deniedになります。sudoが必要なんです。
さくらインターネットの場合は、自分に割り当てられた領域はすべて自分のアカウントの権限で書き換えられるのでいいのですが、ローカルの環境だと逆にそれが出来ないんですよね。まあ、public_htmlを使って自分のホームディレクトリ以下に作ればいいのかな。
「TRANSRAIN」さんの「GITにPUSHしたWEBサイトを自動的に同期させる」では、Web上のPHPファイルをpost-receiveから呼び出し、PHPファイル内でプルするスクリプトを実行させることで回避しています。頭いーなー。
参考

- 作者: 岡本隆史,武田健太郎,相良幸範
- 出版社/メーカー: 技術評論社
- 発売日: 2012/07/10
- メディア: 単行本(ソフトカバー)
- 購入: 7人 クリック: 103回
- この商品を含むブログ (26件) を見る